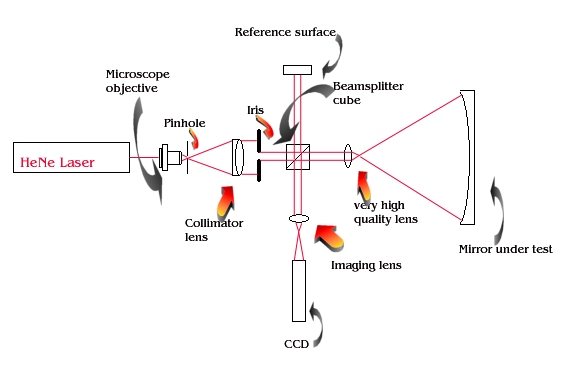
The structure of the interferometer and its functioning principle:
Our instrument is a variant of the Twyman-Green interferometer. Its structure can be seen in the figure. It operates as follows:
The light-source is a HeNe gaslaser with a wavelength of 632.8nms, functioning in TEM 00 operation mode. The laserbeam emerges from it and passes through a microscope objective, than by means of a collimator objective it becomes large diameter parallel beam. An irisdiaphragm narrows down this beam to the desired size. After this the smaller diameter beam of rays passes through a beamsplitter cube. The cube reflects a part of the beam to the reference surface (plane) and lets the other part pass through towards the optic we want to mensurate. The parallel beam emerging from the cube passes through an excellent quality lens or optical system, which transfers this beam into a cone of rays with a light intensity of f/2,6.

The figure shows the structure of the mensuration in case of a spherical mirror. The cone of rays reflected by the mirror we want to mensurate is being transformed back into a parallel beam and interfers with the beam reflected by the reference surface. The occuring interference image is recorded by a CCD camera on the fourth side of the beamsplitter cube. The reference surface is tiltable so the position and density of the interference lines can be changed.
When mensurating a parabolid mirror we need the 500mms Zeiss plane-mirror. By the means of this we reach double precisity by autocollimation since the light is reflected by the main mirror twice on the "focal point- main mirror- Zeiss plane-mirror- main mirror- focal point" route.
Because of the mechanical structure of the interferometer our lab is unique in that we have the opportunity to mensurate complete telescopes through the ocular-extension. In such cases the mensuration result considers the errors of the auxiliary mirror as well because of the "focal point- main mirror- auxiliary mirror- Zeiss plane-mirror- auxiliary mirror- main mirror- focal point" route. The auxiliary mirror can be either Newton or Cassegrain.
Mathematical bases of the RMS and CL calculated with the appraising program: http://home.earthlink.net/~burrjaw/atm/atm_math.lwp/atm_math.htm
A kiértékelő program tesztje: (strange interferogram photo, own appraising)
| Optikcs | Control-mensuration | Control-mensuration | Control-mensuration | Távcső Szolg. Bt. | Max. error |
| Paraboloid mirror (250/1250) theoretically calculated by the radius of curvature |
theoretical 546.1nm innumerable mensuration points PtV=0.00 RMS=0.00 CL=100% In greater detail |
Lab2 546.1nm 278 mensuration points PtV=1/15.44=0.0648 RMS=1/78.4=0.128 CF=99.4% In greater detail |
TSzBt 550nm 2158 mensuration points PtV=1/83=0.012 RMS=1/676=0.00148 CF=99.9% |
0.012 0.0015 0.1% In greater detail | |
| C8 203/2030 | Lab1 550nm ? mensuration points PtV=1/3.4=0.29 RMS=1/15.6=0.064 CF=85% In greater detail |
TSzBt 550nm 335 mensuration points PtV=1/2.5=0.40 RMS=1/15.2=0.0657 CF=84.3% In greater detail |
0.11 0.0017 0.7% In greater detail | ||
| GSO 250/1255 | Lab1 550nm ? mensuration points PtV=1/9=0.110 RMS=1/45=0.022 CL=98% In greater detail |
TSzBt 550nm 104 mensuration points PtV=1/5.88=0.170 RMS=1/38.3=0.0261 CL=97.3% In greater detail |
0.06 0.0041 0.7% In greater detail | ||
| Meade 250/1125 | Lab1 550nm ? mensuration points PtV=1/3.4=0.29 RMS=1/17=0.057 CL=88% In greater detail |
TSzBt 550nm 218 mensuration points PtV=1/3.3=0.307 RMS=1/19.9=0.0502 CL=90.5% In greater detail |
0.017 0.0068 2.5% In greater detail | ||
| 280/1390 Newton Stathis Kafalis |
Lab1 550nm ? mensuration points PtV=1/8.3=0.12 RMS=1/40=0.025 CL=98% In greater detail |
TSzBt 550nm 153 mensuration points PtV=1/4.8=0.207 RMS=1/39=0.0255 CL=97.5% In greater detail |
0.09 0.0005 0.5% In greater detail | ||
| C11 280/2800 | Lab1 550nm ? mensuration points PtV=1/4.5=0.22 RMS=1/28.6=0.035 CL=95% In greater detail |
TSzBt 550nm PtV=1/3.64=0.275 RMS=1/25.4=0.0394 CL=94% In greater detail |
0.055 0.0044 1.0% In greater detail | ||
| INTES 318/1421 | Lab1 632.8nm ? mensuration points CL=95.8% In greater detail |
Lab3 632.8nm ? mensuration points CL=95.0% In greater detail |
Lab5 632.8nm ? mensuration points PtV=1/5.62=0.178 RMS=1/31.3=0.032 CL=96.0% In greater detail |
TSzBt |
In greater detail |
| 352/1883 wrong mirror |
Lab1 632.8nm ? mensuration points PtV=1/2.4=0.425? CL=39.7% In greater detail |
TSzBt PtV=1/1.1=0.912? RMS=1/6.71=0.149 CL=41.8% In greater detail |
-- -- 2.1% In greater detail |
Test of the whole instrument: (own interferogram photo, own appraising)
Let's compare the 3D figures as well!
| Optics | Lab mensuration | Távcső Szolg. Bt. | Error |
| TMB APO 130/780 |
TMB
lab 532nm PtV=1/5.1=0.198 RMS=1/43.5=0.023 CL=97.9% photo (3D) |
TSz lab 532nm PtV=1/4.1=0.246 RMS=1/54=0.0185 CF=98.7% photo (3D) |
+0.048 -0.0045 +0.8% In greater detail |
250/1400 |
ICS
lab 632nm PtV=1/6.25=0.16 RMS=1/34.5=0.029 CL=97% photo (3D) |
TSz
lab 632nm PtV=1/4.93=0.203 RMS=1/38.9=0.0257 CL=97.4% photo (3D) |
+0.043 -0.0033 +0.4% In greater detail |
200/800 |
W.Rohr lab 550nm PtV=0.131 RMS=0.0247 CL=97.6% photo (3D) |
TSz lab 550nm PtV=0.153 RMS=0.0228 CL=98% photo (3D) |
+0.022 -0.0019 +0.4% In greater detail |